


Space Marine Juggernaut
by Friendly Fire
With a loud thump the Ultramarine Juggernaut slammed down his mighty iron foot. The Ork that stood there was reduced to little more than a soup of fleshy gore, blood splattering onto the battle-scarred soil and the Juggernaut's armoured plating.
The ancient machine turned left, to open fire on another large mob of Orks running screaming towards it. It's holy Lascannons opened fire and ripped apart several enemies with every single shot, the devastating blue rays impacting in their midst with the force of a small sun. The Juggernaut's Stormbolter also fired onto the position, one well-guided bolt decapitating the large Ork warrior that appeared to be leading the small warband. Some greenskins survived the onslaught, only to be ripped apart by the Juggernaut's huge Powerfist that was now upon them. The few remaining Orks were trampled by the Juggernaut's lumbering feet, the metal blue behemoth crushing bone and sinew with equal ease.
None were left alive.
Stuff needed
Although the conversion is not all that difficult, pieces from several GW kits were used. I never said this was going to be cheap...
How and where all bits were used will be explained later.
Besides the obvious Dreadnought kit, you'll also need the Imperial Guard Sentinel kit. I also used various bits from a variation of other kits.
You'll need:
- Assault Marine backpacks
- Imperial Guard vehicle accessory sprue
-Ork eavy armour plates
- Plasticard
Constructing the Torso
Right, lets get started with the actual construction process.
I took off by assembling the Dreadnought's upper torso as usual, including the rear engines and sarcophagus . In this stage, the arms were not built nor glued on yet .This is best done after you attached the legs. Also, do not glue the upper torso to the lower torso yet.
Next, I began assembling a suitable construction for the waist/groin area. This was probably the trickiest part of the model. The following picture should help to make it clear how I combined the parts from both Dreadnought and Sentinel kits.
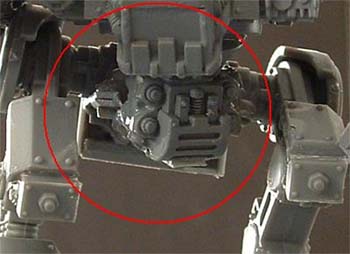
As you can see ,the normal Dreadnought groin'(or lower torso) was cut down on the sides and the back. Be careful when chopping off those legs, you'll need them later.
I then took the engine parts from the Sentinel (where it's legs are normally attached to) and chopped off the front portion.
When holding the engine, you'll notice a small cone' (this is where the crew compartment attaches to the engine). The idea is simple: that area has to be replaced by the Dreadnought's groin.
If you look closely you can see that the engine and groin are not glued straight, they are placed in different angles;. I tilted the groin slightly to simulates a hinge between the front and rear parts. This increases the flexible look of the model.
Let's have a look at the back of the lower torso. Use this picture for reference:
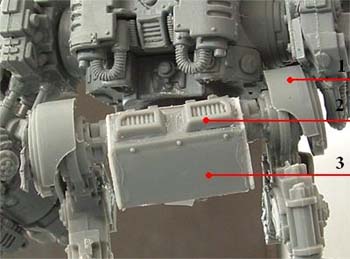
1: I added extra armour to the hips, using the new Searchlights from the IG Tank accessory sprue. The size and shape is perfect for this, and it nicely beefs up the relatively thin Sentinel parts.
2: The exhaust vents are pieces from the Space Marine Jump-packs .
3: I wanted more armoured plating to the rear side of the model. Seen here is a piece from a IG Leman Russ side sponson. It has the perfect shape (angular plating), but alternatively plasticard could be used.
Constructing the legs
Next up: assembling the legs. You can attach the Sentinel legs normally to the Sentinel engine part. You don't have to glue them right away: play with the various poses a little bit to find out which one you like best. Do the same with your upper torso. Posing' is one of the coolest things about constructing huge robots of death!
After you are happy with a certain pose, it's time to glue the stuff together.
You can use this picture for reference:
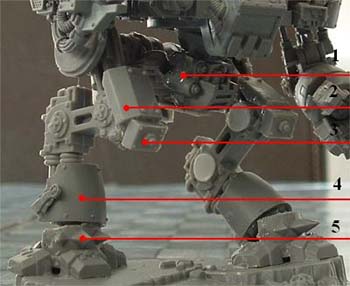
1: Here you can see the lower torso again. Notice how the Sentinel and Dreadnought parts are combined.
2: The Sentinel legs look a bit thin for carrying the walking tank that is a Dreadnought. I decided to beef the upper legs up a bit. I used Sentinel bits for this: the armoured plating to the rear of the crew compartment. The plating was carefully cut and trimmed with a sharp hobby knife. This was necessary in order to glue these parts to the legs.
3: This is somewhat of an obscure bit. These ‘kneepads’ were taken from 40K Tanktraps. You are sure to have laying around (3rd ed starter set). Examine the tanktraps closely and you’re sure to find out how I acquired these parts...
4: An obvious one: the original Dreadnought’s armour plating fits the Sentinel leg perfectly and adds much needed extra volume for a more stable look.
5: The ankles looked a bit weedy, so I glued some extra armour onto them. This distinctive bit is an Ork ‘Eavy Armour plate.
Constructing the arms
So, you've now constructed most of the Juggernaut. All that is left to do are the arms.
Remember that the converted lower torso is wider than the regular one. This could mean that in your specific pose, the arms (most notably the Lascannon arm) will not fit perfectly onto the upper torso.
In the case of my own Juggernaut, the power cables to the lascannon prevented me from gluing the arm on. This meant I had to cut down a part of the arm as well as some of the power cables. On the other hand, maybe your specific pose won't have this problem at all.
You might have noticed how the Powerfist is largely converted. This is a rather complicated part, but you'll only need Sentinel and Dreadnought bits.
Use this picture for reference:
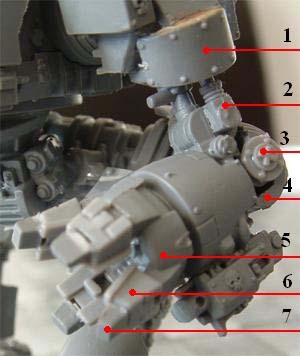
1: The Dreadnought’s Close Combat arm was carefully removed from the shoulder using a hobby knife. Then, I glued a Dreadnought leg onto it’s place. You may have to sand, file or cut down the top portion of the leg in order to get a perfect fit. The seem above the arm is covered in an Ork ‘Eavy Armour plate. You can also see I used some putty to seal the open area of this plate.
2: Notice that the leg is turned ‘upside down’. This makes gluing of both the shoulder and lower arm easier.
3: This part was a little tricky. I glued the close combat arm onto the new upper arm. Then, I glued a piece of plastic sprue to strengthen the connection on the inside. Next, a Sentinel bit was used to cover up this rather messy conversion work.
4: The actual elbow is the upper leg part from the usual Dreadnought legs. Fits perfectly.
5: I took the regular powerfist, and carefully cut off the four ‘fingertips’.
6: Next, I carefully cut the four ‘toes’ from a Sentinel’s foot. One Sentinel foot has three equal toes and a lager one, so you have to cut up a second foot to get the fourth toe. Now glue these toes in place where the fingertips used to be.
7: The original fingertips were attached again, on top op the Sentinel toes.
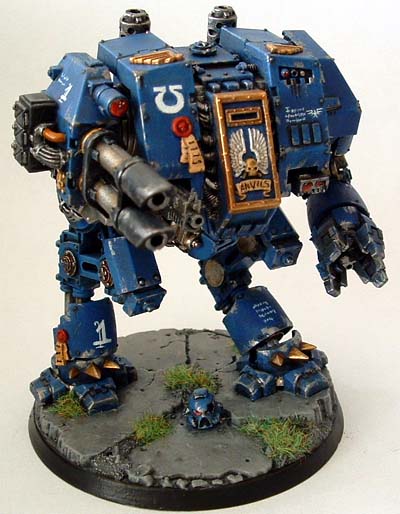
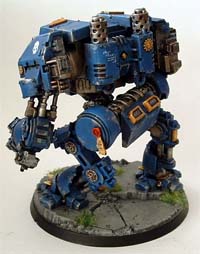
Finished!
Well, that pretty much sums it up.
In the future I will probably be making more Juggernauts. If you are insprired by this conversion and maybe even made your own, why not send them in to my e-mail adress? It'd be cool to share all the possible variants right here on this site!
berden_patrick@hotmail.com
Here are some more pics of the finished Juggernaut:
++Transmission Ends++