


Scratch Building a Titan
By HoodedReaper
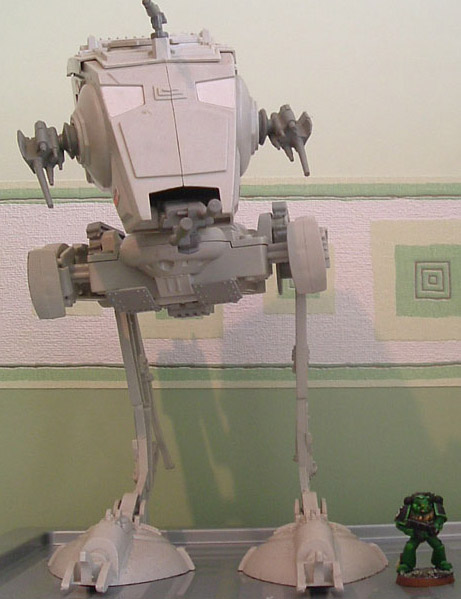
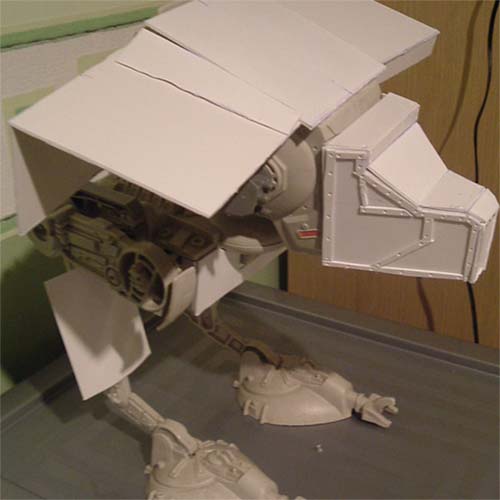
When i first got the idea to scratch build a titan,i remember seeing a perfect model to act as the 'skeleton' for the Titan,and that was a Star Wars AT-ST model.
So i went to a small shop in my city that holds a collection of Star Wars models and figurines and i bought an AT-ST model.
The model stands at 10.5" tall and 6.5" wide and it was £25. I then went and got some plasti-card (and alot of it) and started construction.
[see pic below]
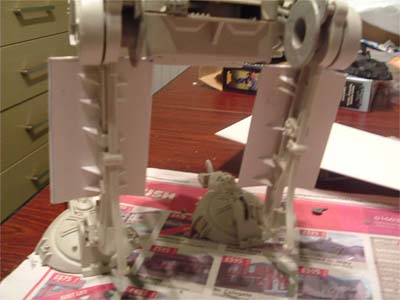
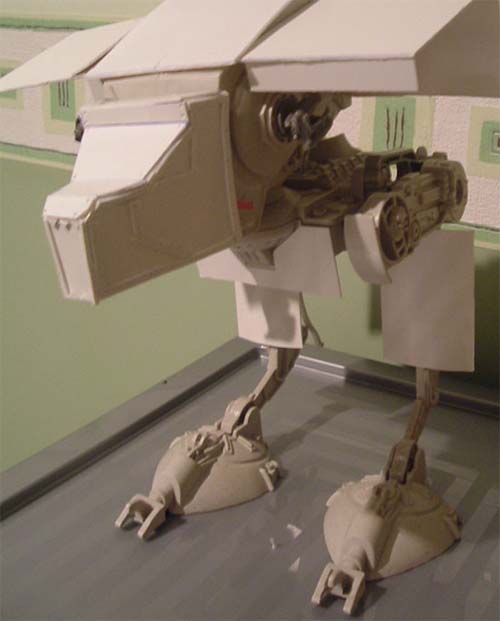
First of all i had to remove the weapons...the guns on the side could just be pulled off,but the one underneath the cockpit part took some time.
Firstly i tried pulling it off,that failed,so i tried hacking it off with my clippers and that failed.So in came the trusty hobby knife,i managed to cut away about an inch,and it still wouldn't come off. So i decided to un-screw the bottom section of the walker,and when i took the last screw out the mechanisum (sp?) flew out! So after taking out the mechanisum i had some free space to work around removing the gun.I eventually removed the gun and thought i'd try and remove the cockpit/body of the walker,but there was no way of removing it.
So i put the mechanisum back together and decided to add on top of the body.I removed the top hatch from the body,but i may add that back on later.I also added some armour to the waist of the walker.
[see pic below]

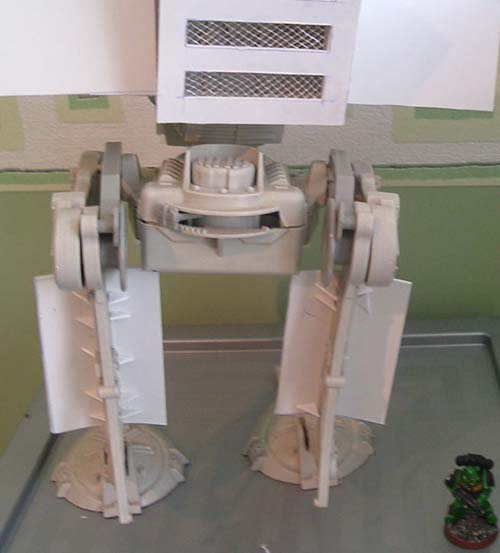
Next step was to calcualate the measurements for the leg armour. I went for a 3"x2" piece of plasti-card for the leg armour. I then put the cut plasti-card in a bowl of hot water for about 30mins and this softened it and i was able to bend it abit easier.
I bent the plasti-card and attached them to the legs of the walker.

To re-inforce the armour on the legs and make it more sturdy,i cut little triangle pieces and glued them to the back of the armour. Hopefully this'll give it more strength and support.
[see pic below]
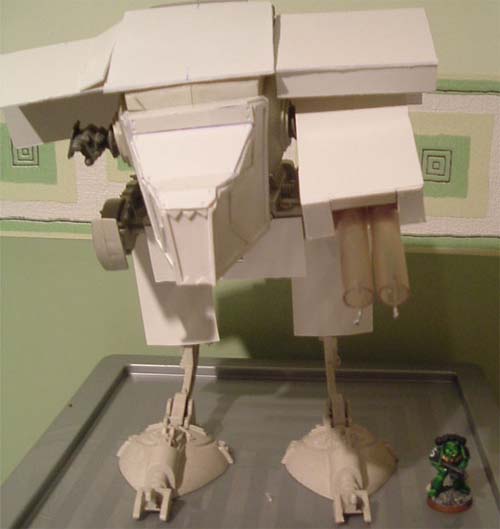
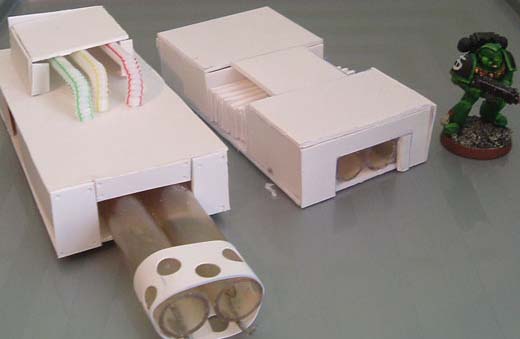
Next step i added a 3.5"x3" shoulder guard with a 2"x3" back piece. Once the shoulder mounts were fitted i then started work on one of the weapons. I decided to start with the inferno gun. I made a 4"x2"x1.8" box with a gap on one side. This gap allowed me to attach the gun to the torso easily.
I then took a piece of 1.5" diameter tube and cut to the desired length. Before i attached the top 'lid' of the box,i added 2 strips of sprue to give support to the tubes.After the box was glued together i then drilled a hole underneath both tubes and glued some bent wire.
When i attached the arm to the torso,it wasn't balanced out correctly,so i glued 2x 1p coins to the inside of the arm to counter balance it.
Next thing to do was to build the head.Here is a rough diagram of the measurements...
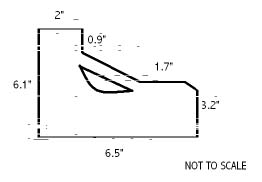
Once i had measured one side,i then mirrored the pattern for the other side of the head.Once i had both pieces,i then glued them to the side of the AT-ST body. From there i measured and cut pieces of plasti-card to finish off the structure of the head.
Once the main structure of the head was complete,i then added some details.ie border,mouth,rivet holes.
Next up was the back,i done a couple of quick designs and decided on which one i was gonna do....so i cut the correct pieces of plasti-card and built the 'frame' i then cut out the back part and the design and added some mesh. Inside i glued 2x 2p coins to give some weight to the back.I glued the top on and the back was complete.
Next i made the other arm,i made a replica arm to the inferno gun,and added some spare pipe. I then cut some strips of plasti-card for the plasma coils and glued them on.The top of the 'box' was cut and attached.Voila! the arm is complete!
+next up is the re-inforced legs and feet!+
So i went to a small shop in my city that holds a collection of Star Wars models and figurines and i bought an AT-ST model.
The model stands at 10.5" tall and 6.5" wide and it was £25. I then went and got some plasti-card (and alot of it) and started construction.
[see pic below]
First of all i had to remove the weapons...the guns on the side could just be pulled off,but the one underneath the cockpit part took some time.
Firstly i tried pulling it off,that failed,so i tried hacking it off with my clippers and that failed.So in came the trusty hobby knife,i managed to cut away about an inch,and it still wouldn't come off. So i decided to un-screw the bottom section of the walker,and when i took the last screw out the mechanisum (sp?) flew out! So after taking out the mechanisum i had some free space to work around removing the gun.I eventually removed the gun and thought i'd try and remove the cockpit/body of the walker,but there was no way of removing it.
So i put the mechanisum back together and decided to add on top of the body.I removed the top hatch from the body,but i may add that back on later.I also added some armour to the waist of the walker.
[see pic below]
Next step was to calcualate the measurements for the leg armour. I went for a 3"x2" piece of plasti-card for the leg armour. I then put the cut plasti-card in a bowl of hot water for about 30mins and this softened it and i was able to bend it abit easier.
I bent the plasti-card and attached them to the legs of the walker.
To re-inforce the armour on the legs and make it more sturdy,i cut little triangle pieces and glued them to the back of the armour. Hopefully this'll give it more strength and support.
[see pic below]
Next step i added a 3.5"x3" shoulder guard with a 2"x3" back piece. Once the shoulder mounts were fitted i then started work on one of the weapons. I decided to start with the inferno gun. I made a 4"x2"x1.8" box with a gap on one side. This gap allowed me to attach the gun to the torso easily.
I then took a piece of 1.5" diameter tube and cut to the desired length. Before i attached the top 'lid' of the box,i added 2 strips of sprue to give support to the tubes.After the box was glued together i then drilled a hole underneath both tubes and glued some bent wire.
When i attached the arm to the torso,it wasn't balanced out correctly,so i glued 2x 1p coins to the inside of the arm to counter balance it.
Next thing to do was to build the head.Here is a rough diagram of the measurements...
Once i had measured one side,i then mirrored the pattern for the other side of the head.Once i had both pieces,i then glued them to the side of the AT-ST body. From there i measured and cut pieces of plasti-card to finish off the structure of the head.
Once the main structure of the head was complete,i then added some details.ie border,mouth,rivet holes.
Next up was the back,i done a couple of quick designs and decided on which one i was gonna do....so i cut the correct pieces of plasti-card and built the 'frame' i then cut out the back part and the design and added some mesh. Inside i glued 2x 2p coins to give some weight to the back.I glued the top on and the back was complete.
Next i made the other arm,i made a replica arm to the inferno gun,and added some spare pipe. I then cut some strips of plasti-card for the plasma coils and glued them on.The top of the 'box' was cut and attached.Voila! the arm is complete!
+next up is the re-inforced legs and feet!+